UITableViewのセルを簡単にカスタマイズする方法を説明します。UITableViewCellにはもともとカスタマイズ能力が備わっているため、プロトタイプセルを作成して一から独自のカスタムクラスを作成しなくても、ある程度自由に表示内容を変更することができます。
デフォルトのセルのスタイルをうまく使いこなせれば、他のアプリと親和性が高く、見た目の違和感が少ないテーブルビューを作成することができます。
スタイルの使い分け
UITableViewのセルのスタイルによる見た目の違いを説明します。
まずSingle Viewプロジェクトを作成します。

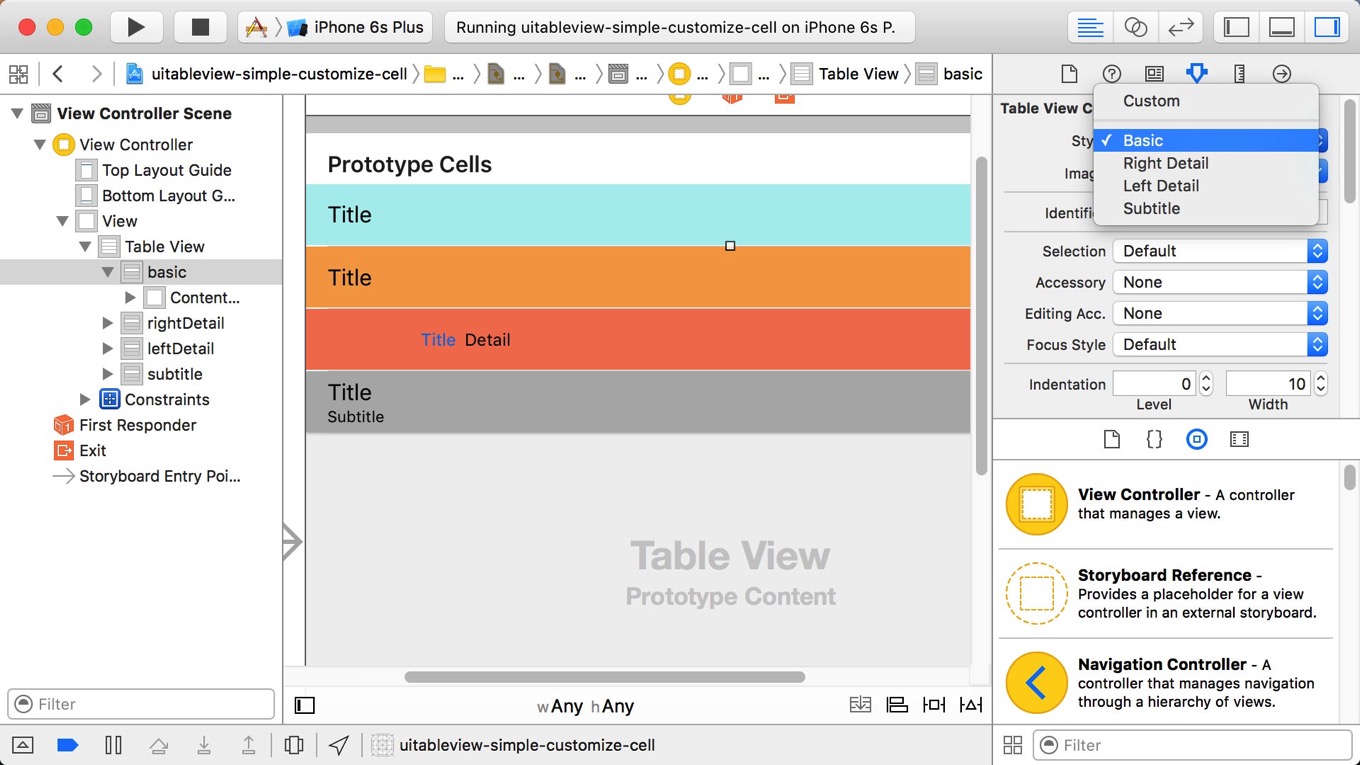
Interface BuilderでTable Viewをドロップし、その上にTable View Cellを4つドロップします。上からスタイルとIdentifierを以下のように設定します。
- Basic: 基本スタイル。IDは”basic”
- Right Detail: 説明が右寄せのスタイル。IDは”rightDetail”
- Left Detail: 説明が左寄せのスタイル。IDは”leftDetail”
- Subtitle: タイトルの下に説明のスタイル。IDは”subtitle”
Table ViewのデータソースとしてViewControllerを設定しておきます。ViewControllerのソースコードは以下のようになります。Personクラスは、名前やフリガナを保持するだけのシンプルなクラスです。
class ViewController: UIViewController, UITableViewDataSource {

    @IBOutlet weak var tableView: UITableView!

    //疑似個人情報生成を使用
    //http://hogehoge.tk/personal/generator/
    var persons: [Person] = [
        Person(name: "大槻泰弘", kana: "オツキヤスヒロ", gender: "男", age: 31),
        Person(name: "福元茉奈", kana: "フクモトマナ", gender: "女", age: 44),
        Person(name: "鹿野繁雄", kana: "カノシゲオ", gender: "男", age: 20),
        Person(name: "小原桃香", kana: "オハラモモカ", gender: "女", age: 22),
        Person(name: "清田初男", kana: "キヨタハツオ", gender: "男", age: 58),
    ]

    override func viewDidLoad() {
        super.viewDidLoad()
    }

    override func didReceiveMemoryWarning() {
        super.didReceiveMemoryWarning()
    }


    func tableView(tableView: UITableView, numberOfRowsInSection section: Int) -> Int {
        return persons.count
    }

    func tableView(tableView: UITableView, cellForRowAtIndexPath indexPath: NSIndexPath) -> UITableViewCell {
        var cell: UITableViewCell! = nil

        if indexPath.row == 1 {
            //Left Detailスタイル
            cell =  tableView.dequeueReusableCellWithIdentifier("rightDetail", forIndexPath: indexPath)
        } else if indexPath.row == 2 {
            //Right Detailスタイル
            cell =  tableView.dequeueReusableCellWithIdentifier("leftDetail", forIndexPath: indexPath)
        } else if indexPath.row == 3 {
            //Subtitleスタイル
            cell =  tableView.dequeueReusableCellWithIdentifier("subtitle", forIndexPath: indexPath)
        } else {
            //Basicスタイル
            cell = tableView.dequeueReusableCellWithIdentifier("basic", forIndexPath: indexPath)
        }
        let person = persons[indexPath.row]
        cell.textLabel?.text = person.name
        cell.detailTextLabel?.text = person.kana
//        cell.imageView?.image = UIImage(named: "idea.png")
//        cell.accessoryType = UITableViewCellAccessoryType.DisclosureIndicator
        return cell
    }
}
cellForRowAtIndexPathでは、Basic、Right Detail、Left Detail、Subtitleセルが順番に表示されるよう行ごとにIDを切り替えていることに注目してください。

以下の順に表示されています。
- Basic: 基本スタイル。1行目
- Right Detail: 説明が右寄せのスタイル。2行目
- Left Detail: 説明が左寄せのスタイル。3行目
- Subtitle: タイトルの下に説明のスタイル。4行目
セルのスタイルによって、名前を設定したtextLabelや、読み仮名を設定したdetailTextLabelの有無や位置が変更されていることに注目です。
画像・アクセサリの追加
セルの左側に画像を、右側にアクセサリを追加する事もできます。
    func tableView(tableView: UITableView, cellForRowAtIndexPath indexPath: NSIndexPath) -> UITableViewCell {
        var cell: UITableViewCell! = nil

        if indexPath.row == 1 {
            //Left Detailスタイル
            cell =  tableView.dequeueReusableCellWithIdentifier("rightDetail", forIndexPath: indexPath)
        } else if indexPath.row == 2 {
            //Right Detailスタイル
            cell =  tableView.dequeueReusableCellWithIdentifier("leftDetail", forIndexPath: indexPath)
        } else if indexPath.row == 3 {
            //Subtitleスタイル
            cell =  tableView.dequeueReusableCellWithIdentifier("subtitle", forIndexPath: indexPath)
        } else {
            //Basicスタイル
            cell = tableView.dequeueReusableCellWithIdentifier("basic", forIndexPath: indexPath)
        }
        let person = persons[indexPath.row]
        cell.textLabel?.text = person.name
        cell.detailTextLabel?.text = person.kana
        //左側の画像
        cell.imageView?.image = UIImage(named: "idea.png")
        //右側のアクセサリ
        cell.accessoryType = UITableViewCellAccessoryType.DisclosureIndicator
        return cell
    }
cellForRowAtIndexPathでセルのimageViewとaccessoryTypeを設定します。

画像とアクセサリ(矢印)が表示されました。アクセサリはaccessoryTypeで設定する以外にもaccessoryViewにUIViewのサブクラスを設定することもできます。
accessoryViewには、例えばUISegmentedControlやUISwitchを埋め込むことができるので、設定画面で各種設定値を保存する場合に便利に使うことができます。