■階層: NSObject > UIResponder > UIView > UIScrollView > UITableView
UITableViewはアイテム情報を行毎に表示するためのクラスです。
UIViewController内で生成する場合、通常UIViewControllerにUITableViewDataSourceプロトコルとUITableViewDelegateプロトコルを実装します。
目次
<li>
  <a href="#i-2"><span class="toc_number toc_depth_1">2</span> プロパティ</a><ul>
    <li>
      <a href="#delegate"><span class="toc_number toc_depth_2">2.1</span> delegate</a>
    </li>
    <li>
      <a href="#dataSource"><span class="toc_number toc_depth_2">2.2</span> dataSource</a>
    </li>
    <li>
      <a href="#editing"><span class="toc_number toc_depth_2">2.3</span> editing</a>
    </li>
  </ul>
</li>

<li>
  <a href="#i-3"><span class="toc_number toc_depth_1">3</span> メソッド</a><ul>
    <li>
      <a href="#setEditinganimated"><span class="toc_number toc_depth_2">3.1</span> setEditing:animated:</a>
    </li>
  </ul>
</li>

<li>
  <a href="#i-4"><span class="toc_number toc_depth_1">4</span> サンプル</a>
</li>
<li>
  <a href="#i-5"><span class="toc_number toc_depth_1">5</span> 参考情報</a>
</li>
生成
initWithFrame:style:
指定されたフレームとスタイルを利用してオブジェクトを生成します。
let tableView = UITableView(frame:CGRectMake(10, 10, 300, 600), style:UITableViewStyle.Plain)
プロパティ
delegate
UITableViewで発生するイベントを処理するためのデリゲートを設定するためのプロパティ。
■定義
weak var delegate: UITableViewDelegate?
■使用例: selfはUITableViewDelegateを実装している必要がある。
tableView.delegate = self
dataSource
UITableViewに表示するデータを供給するためのプロパティ。
■定義
weak var dataSource: UITableViewDataSource?
■使用例: selfはUITableViewDataSourceを実装している必要がある。
tableView.dataSource = self
editing
UITableViewが編集モードかどうかを表すプロパティ
■定義
var editing: Bool
■使用例: 値を設定した場合animated = NOで呼び出される。
tableView.editing = editing
メソッド
setEditing:animated:
UITableViewの編集モードを変更するメソッド。
■定義
func setEditing(_ editing: Bool, animated animated: Bool)
■使用例: editing=YES/NO。animated=YES/NO。
tableView.setEditing(editing, animated: animated)
サンプル
- ストーリーボードを利用してUITableViewを設置。
- delegateとdataSourceもストーリーボードで設定。
- Editor > Embed in Navigation Controllerでナビゲーションコントローラーを追加。
class ViewController: UIViewController, UITableViewDataSource, UITableViewDelegate {

    @IBOutlet weak var tableView: UITableView!

    var rows = ["りんご", "バナナ", "パイナップル", "もも", "かき"]

    override func viewDidLoad() {
        super.viewDidLoad()
        navigationItem.leftBarButtonItem = editButtonItem()

        // UITableViewをプログラムから生成する場合
        // ただしオートレイアウトを使う場合ストーリーボードを使った方が簡単です。
//        let tableView = UITableView(frame:CGRectMake(10, 10, 300, 600), style:UITableViewStyle.Plain)
//        self.view.addSubview(tableView)
    }

    override func didReceiveMemoryWarning() {
        super.didReceiveMemoryWarning()
    }

    func tableView(tableView: UITableView, numberOfRowsInSection section: Int) -> Int {
        //UITableViewDataSource: データの個数を返す
        return rows.count
    }

    func tableView(tableView: UITableView, cellForRowAtIndexPath indexPath: NSIndexPath) -> UITableViewCell {
        //UITableViewDataSource: セールにデータを設定する
        let cell = UITableViewCell(style: UITableViewCellStyle.Default, reuseIdentifier: "myCell")
        cell.textLabel?.text = rows[indexPath.row]
        cell.backgroundColor = UIColor.lightGrayColor()
        return cell
    }

    func tableView(tableView: UITableView, didSelectRowAtIndexPath indexPath: NSIndexPath) {
        //UITableViewDelegate: セールがタップされたときの処理
        print(rows[indexPath.row])
    }

    override func setEditing(editing: Bool, animated: Bool) {
        super.setEditing(editing, animated: animated)
        tableView.setEditing(editing, animated: animated)
    }
}
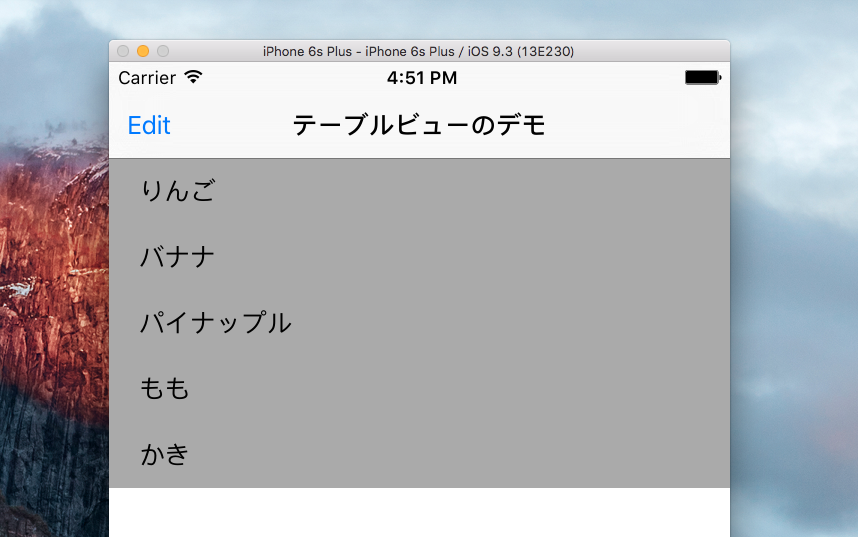
実行結果。Editボタンを押すことで編集モードに入ります。
