iOSアプリで使われることの多いクラスUITableViewの基本的な使い方を紹介します。
UITableViewはさまざまなデータを複数行にわたって表示することができる多機能なクラスです。表示する内容は自由に変更可能で、テキストはもとより画像を追加したり、背景色を変更したり、サイズを変更したりといった多様なカスタマイズが可能となっています。
ここでは最も簡単に各行にテキストを表示し、行をクリックしたタイミングでデバッグコンソールにその内容を表示するプログラムを作成します。
目次
プロジェクト作成と画面の準備
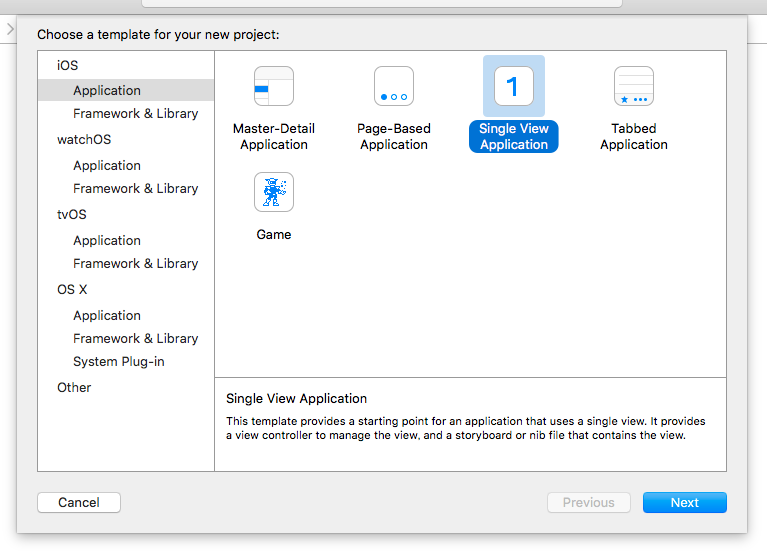
Single View Applicationを作成します。

適当に名前をつけてプロジェクトを作成したらMain.storyboardを選択。オブジェクトライブラリからTable Viewを選択してドロップします。

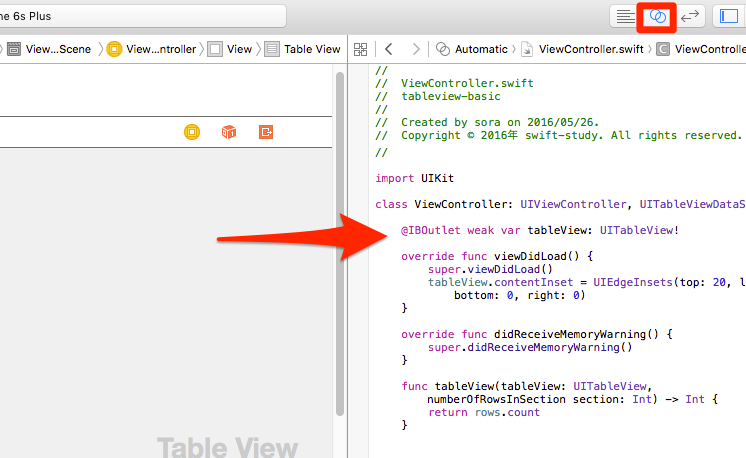
▲アシスタントエディタを開き先ほどドロップしたTable ViewをCtrl+ドラッグして、ViewController.swiftのソースコードの上でドロップします。tableViewという名前のアウトレットを作成しておきましょう。

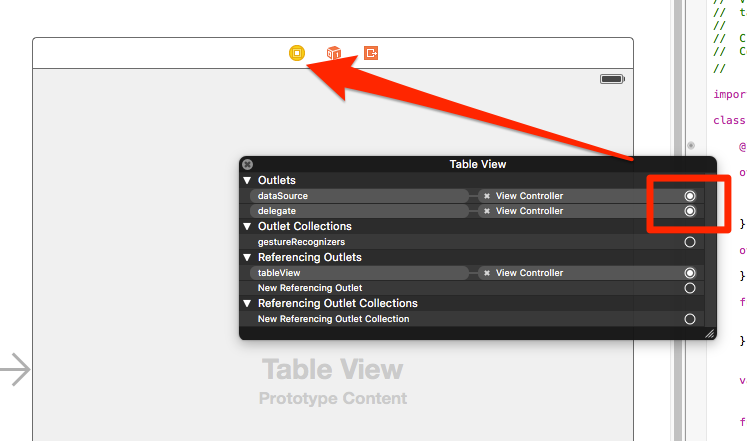
▲Table Viewを右クリックしdataSource、delegateをViewController(黄色のアイコン)にドロップして接続しておきます。
これで画面の準備は完成です。
ソースコードの作成
UITableView理解のポイントはdataSourceおよびdelegateの設定にあります。
dataSourceはデータソース=データの源の意味。UITableViewにデータを供給する役割を担うもので、UITableViewの場合UITableViewDataSourceというプロトコルを実装したオブジェクトを指定する必要があります。
対してdelegateはタップなどのイベントが発生した際、そのイベントの連絡先となるものです。UITableViewの場合UITableViewDelegateというプロトコルを実装する必要があります。
これを踏まえるとViewController.swiftのソースコードを以下のように実装することになります。
class ViewController: UIViewController, UITableViewDataSource, UITableViewDelegate {

    @IBOutlet weak var tableView: UITableView!

    //画面に表示するデータ
    var rows = ["東京", "神奈川", "埼玉", "千葉", "群馬", "茨城"]

    override func viewDidLoad() {
        super.viewDidLoad()
        //ステータースバーにかぶらないために追加
        tableView.contentInset = UIEdgeInsets(top: 20, left: 0, bottom: 0, right: 0)
        //セルの再利用を行うためにあらかじめUITableViewCellを登録
        tableView.registerClass(UITableViewCell.self, forCellReuseIdentifier: "myCell")
    }

    override func didReceiveMemoryWarning() {
        super.didReceiveMemoryWarning()
    }

    func tableView(tableView: UITableView, numberOfRowsInSection section: Int) -> Int {
        //UITableViewDataSource: データの個数を返す
        return rows.count
    }

    func tableView(tableView: UITableView, cellForRowAtIndexPath indexPath: NSIndexPath) -> UITableViewCell {
        //UITableViewDataSource: セルにデータを設定する
        //dequeueReusableCellWithIdentifier:forIndexPathでは
        //・セルが存在しない場合は自動的にセルが作成され
        //・セルが存在する場合はそれが返される
        let cell = tableView.dequeueReusableCellWithIdentifier("myCell", forIndexPath: indexPath)
        cell.textLabel?.text = rows[indexPath.row]
        cell.backgroundColor = UIColor.lightGrayColor()
        return cell
    }

    func tableView(tableView: UITableView, didSelectRowAtIndexPath indexPath: NSIndexPath) {
        //UITableViewDelegate: セールがタップされたときの処理
        print(rows[indexPath.row])
    }
}
先ほどdataSourceとdelegateをどちらもViewControllerとして設定しているため、ViewControllerにUITableViewDataSourceとUITableViewDelegatという2つのプロトコルを実装することになります。

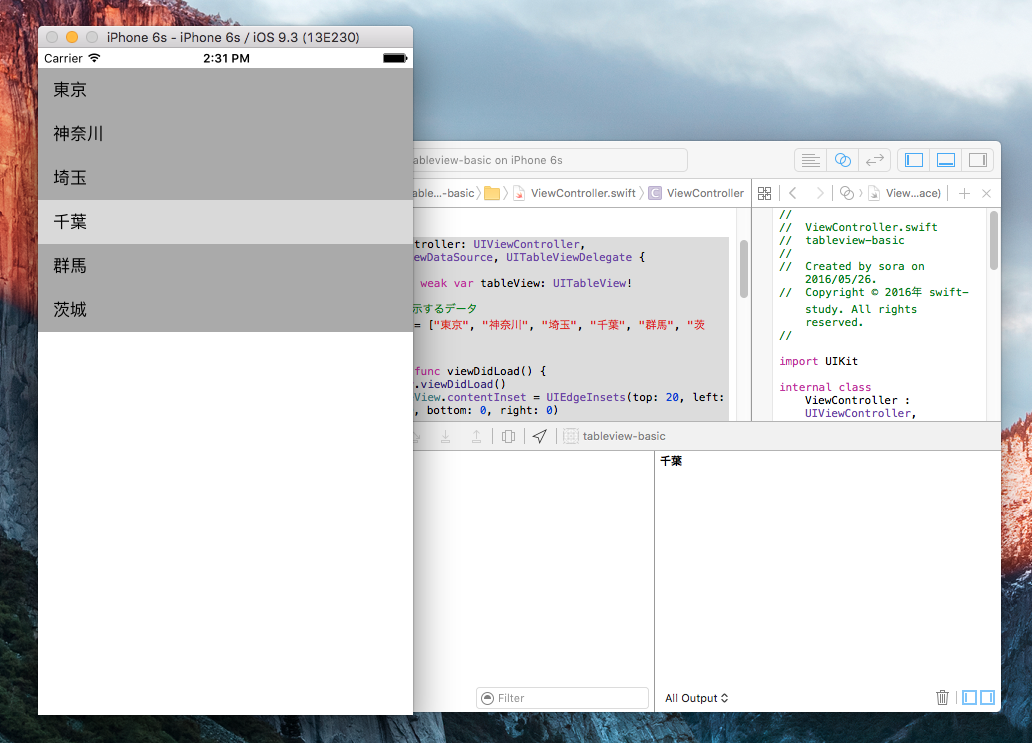
実行すると都道府県の行が表示され、タップするとその内容がデバッグコンソールに表示されます。
重要メソッド1: tableView:numberOfRowsInSection:
UITableViewDataSourceの必須メソッドの一つ。データの行数を返すメソッドです。正確にはセクションごとの行数を返します。
単純な場合:
func tableView(tableView: UITableView, numberOfRowsInSection section: Int) -> Int {
    return rows.count
}
セクションが2個存在:
func tableView(tableView: UITableView, numberOfRowsInSection section: Int) -> Int {
    var result = 0
    if section == 0 {
        result = 1
    } else if section == 1 {
        result = 10
    }
    return result
}
重要メソッド2: tableView:cellForRowAtIndexPath:
UITableViewDataSourceの必須メソッドの一つ。セル返すメソッドです
単純な場合:
func tableView(tableView: UITableView, cellForRowAtIndexPath indexPath: NSIndexPath) -> UITableViewCell {
    let cell = tableView.dequeueReusableCellWithIdentifier("myCell", forIndexPath: indexPath)
    cell.textLabel?.text = rows[indexPath.row]
    return cell
}
複雑な場合: セクションごとにセルが異なる場合Identifierで区別します。
func tableView(tableView: UITableView, cellForRowAtIndexPath indexPath: NSIndexPath) -> UITableViewCell {
    var resultCell: UITableViewCell? = nil
    if indexPath.section == 0 {
    let cell: DetailTopCell = tableView.dequeueReusableCellWithIdentifier("TopCell", forIndexPath: indexPath) as! DetailTopCell
        cell.configureCell(indexPath: indexPath)
        resultCell = cell
    } else if indexPath.section == 1 {
        let cell: DetailMidCell = tableView.dequeueReusableCellWithIdentifier("MidCell", forIndexPath: indexPath) as! DetailMidCell
        cell.configureCell(indexPath: indexPath)
        resultCell = cell
    }
    return resultCell!
}